Jenkins (formerly hudson) is a very cool CI-Tool. It is easily possible to automate building, testing and deployment with Jenkins. It is possible to split the task into several Jenkins jobs. This has a few advantages:
- You see very fast, if your code compiles. Long before it is deploy.
- You get a better feedback how long it takes to compile/test/deploy.
- You can trigger single parts of your process.
I will give a short introduction how to setup such a build chain here.
To be consistent, it is important to deploy exactly the code which has been tested before. This can be achieved by copying the tested workspace into the next project. There are two plugins which help you to build such a szenario:
- Build Pipeline Plugin: defines a Graph of projects. If a project builds successfully the next one is triggered automatically. It is also possible to trigger certain steps by hand.
- Jenkins Clone Workspace SCM Plug-in: instead of checking out a fresh copy from your SCM you can simply clone another Jenkins workspace.
To play around this, let’s create two Jenkins jobs. Configure the first one as you normally would. E.g. check out source regulary from SVN and execute „mvn clean test„. In the post build actions section, check „Archive for Clone Workspace SCM„, include „**“ (note: this won’t include .svn oder .git directories, we come to this later) and archive the „most recent successful build„.
Next, you have two options: You can check „Build Pipeline Plugin -> Manually Execute Downstream Project„. The project will then not be built automatically, you have to manually trigger it. The other option is to use the normal „Build other projects“ checkbox which will trigger the next build automatically. In both cases enter the name of the next project to build.
The second job is configured with „Clone Workspace“ as SCM. Select the first job here and do not specify a build trigger. The rest can be configured as you always do it. E.g. specify „mvn deploy“ as build step.
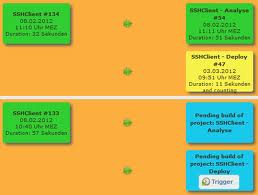
The last step to do is to add a new View to Jenkins. Give it a proper name („my Project – pipeline„) and select the „Build Pipeline View„. Select your first job as the initial job and you get a nice overview about what Jenkins is doing with your jobs.
You can chain many more jobs, you can also execute them in parallel (for example a sonar analyse can be done parallel to the deployment). Here is a screenshot of a (still very small) build pipeline:
The clone workspace scm plugin ignores some files and directories. This cannot be configured and can cause a problem. Let’s assume that the package and deployment job needs information about the SVN Revision, but the .svn directories are missing. I did not find a good solution for that, but if you use a freestyle project it is possible to transfer the .svn directories by compressing them in the first job and decompress them in the later jobs. Add a new build step at the end of all build steps which executes a shell script. The script is:
find -name .svn -type d | tar -T- -cjf svn.tar.bz2
Replace „.svn“ through „.git„, „CVS“ or whatever files you want to keep. Next, in your second job, add the following shell script as the first build step:
tar -xjf svn.tar.bz2
rm svn.tar.bz2
Now your workspace looks like a full checkout.
Happy developing! ![]()
